
dental pod instructions
Dental Pod Instructions: A Comprehensive Guide
Discover a simple, effective way to maintain your dental appliance! This guide details using ultrasonic waves for thorough cleaning, removing plaque and harmful buildup safely.
What is a Dental Pod?
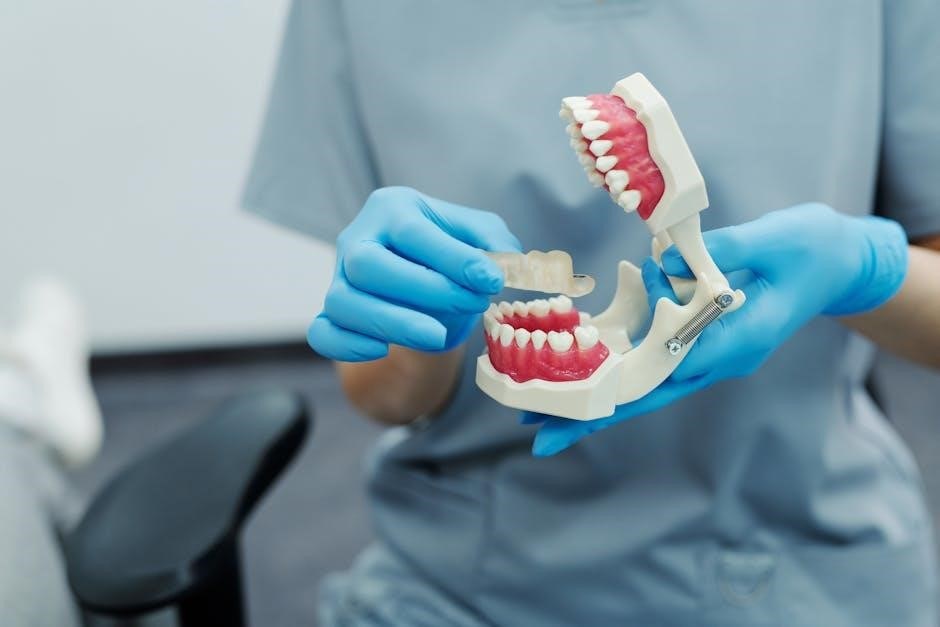
A Dental Pod is an innovative ultrasonic cleaning device specifically designed for removable dental appliances like retainers, aligners, and mouthguards. Utilizing advanced ultrasonic technology, it generates thousands of microscopic bubbles that effectively, yet gently, remove plaque, food debris, and harmful bacteria.

Unlike traditional cleaning methods, a Dental Pod doesn’t rely on abrasive brushing, which can potentially damage delicate appliance materials. It’s a compact, user-friendly solution for maintaining optimal oral hygiene and extending the life of your dental investment. The device ensures a deep clean, reaching areas that manual brushing often misses, contributing to fresher breath and a healthier mouth. It’s a convenient alternative for daily or frequent cleaning.
Benefits of Using a Dental Pod
Employing a Dental Pod offers numerous advantages for maintaining your dental appliance and overall oral health. It effectively removes plaque, gunk, and harmful bacterial buildup without causing damage to the appliance’s shape or structure. Regular use contributes to fresher breath and a cleaner mouth, reducing the risk of bad odors and potential infections.
Dental Pods are incredibly convenient and simple to operate – just fill, add a cleaning tablet, place your appliance, and initiate the cycle! They are more effective than manual cleaning, reaching areas brushes miss. Consistent cleaning, especially after extended wear (over 6 hours), minimizes biofilm development. Ultimately, a Dental Pod promotes hygiene and prolongs your appliance’s lifespan.
Compatible Appliances
Dental Pods are designed for versatile cleaning, accommodating a wide range of dental appliances. This includes retainers – both Vivera and other brands – ensuring they remain hygienic and effective. Dentures, mouthguards (sports and night guards), and aligners are also safely and thoroughly cleaned using this ultrasonic technology.
However, it’s crucial to verify compatibility with any custom-made or particularly delicate appliances. Avoid using the pod with appliances containing metal parts that could be damaged by ultrasonic vibrations. Always consult your dentist or orthodontist if you have concerns about a specific appliance. The Dental Pod provides a convenient solution for maintaining cleanliness across various dental devices, promoting optimal oral health.

Setting Up Your Dental Pod
Initial setup is remarkably straightforward. Begin by carefully unboxing your Dental Pod and inspecting all components for any damage sustained during shipping. Ensure the unit, power adapter, and any included accessories are present and in good condition. Select a stable, flat surface near a power outlet for placement – avoid damp environments.
Connect the power adapter to the pod and plug it into the outlet. Before first use, it’s recommended to run a cleaning cycle with just water to rinse the internal components. This prepares the pod for optimal performance. Proper placement and a reliable power source are key to ensuring consistent and effective cleaning cycles.
Unboxing and Initial Inspection
Carefully remove the Dental Pod from its packaging, retaining the box and packing materials for potential future use or warranty claims. Thoroughly inspect the unit for any visible signs of damage – cracks, dents, or loose parts. Verify that all included components are present: the Dental Pod itself, the power adapter, and any accompanying cleaning solution samples or instructions.

Check the power adapter for any fraying or damage to the cord. Ensure the pod’s internal tank appears clean and free of debris. If any damage is detected, do not attempt to use the device; contact customer support immediately. A meticulous initial inspection guarantees safe and effective operation.
Placement and Power Source

Position the Dental Pod on a stable, level surface away from direct sunlight and excessive moisture. Ensure adequate ventilation around the unit to prevent overheating. Avoid placing it near water sources or in areas prone to spills. Connect the provided power adapter to the Dental Pod and then plug it into a standard electrical outlet.
Verify the outlet provides the correct voltage to avoid damaging the device. Do not use extension cords or adapters unless absolutely necessary, and ensure they are appropriately rated for the pod’s power requirements. A secure placement and reliable power source are crucial for optimal performance and longevity.
Step-by-Step Usage Instructions
Begin by carefully filling the tank to the recommended level, ensuring your dental appliance will be fully submerged. Next, introduce a sterilizing tablet into the water for enhanced cleaning effectiveness – one tablet per cycle is generally sufficient. Gently place your appliance into the tank, confirming it doesn’t touch the sides or bottom excessively.

Securely connect the power adapter and then, with a simple tap of the power button, initiate the cleaning cycle. The Dental Pod will now utilize ultrasonic waves to dislodge plaque and debris. It’s remarkably straightforward – fill, add, place, and activate!
Filling the Tank
To begin the cleaning process, carefully fill the Dental Pod’s tank with water. It’s crucial to fill it to the specifically indicated “recommended level” marked inside the unit; overfilling can cause spillage, while underfilling may prevent complete submersion of your appliance. Use cool or lukewarm tap water – avoid hot water, as it could potentially damage certain materials.
Ensure the water level adequately covers the entire surface of your dental appliance when placed inside. This guarantees that the ultrasonic vibrations effectively reach all areas, removing plaque and debris. Double-check for proper water level before proceeding to the next step.

Adding Cleaning Solution (Tablets)
For optimal cleaning and disinfection, a sterilizing tablet is highly recommended with each use. Drop one tablet into the water-filled tank before placing your dental appliance inside. These tablets are specifically formulated to enhance the ultrasonic cleaning process, effectively eliminating bacteria and biofilms that can develop after extended wear – particularly if worn for over six hours.
Allow the tablet to fully dissolve and activate in the water, creating a cleaning solution. This ensures thorough sanitation. Using a tablet with every cycle contributes to a more hygienic and effective cleaning routine, safeguarding your oral health and extending the life of your appliance.
Placing Your Dental Appliance
Once the tank is filled with water and the cleaning tablet has dissolved, carefully place your dental appliance into the tank. Ensure the entire appliance is submerged in the cleaning solution for complete coverage. The Dental Pod is designed to accommodate various appliances, but avoid overcrowding; ensure sufficient space for the ultrasonic waves to circulate freely.
Confirm that no part of the appliance is touching the sides or bottom of the tank, maximizing the cleaning effect. Gently lower the appliance into the water to prevent any potential damage. Proper placement is crucial for effective plaque and gunk removal, maintaining the appliance’s shape and structure.
Initiating the Cleaning Cycle
With your dental appliance securely placed within the tank, it’s time to start the cleaning cycle. Locate the power button on the Dental Pod – typically a single, easily accessible button. A simple tap is all that’s needed to activate the ultrasonic cleaning process. The pod will begin emitting ultrasonic waves, creating thousands of tiny bubbles that effectively lift away debris.
Ensure the pod is plugged into a functioning power source before initiating. Observe the indicator light; it will usually illuminate to confirm the cycle has begun. The process is remarkably straightforward, designed for ease of use and optimal cleaning results.
Cleaning Cycle Duration & Indicators
The standard cleaning cycle for most Dental Pods typically lasts between 15-20 minutes, providing ample time for thorough cleaning. However, some models may offer adjustable cycle durations. Pay attention to the indicator lights on your device; these provide crucial feedback on the cleaning process. A steady light usually signifies the cycle is in progress.
Many pods feature an auto-off function, shutting down automatically upon cycle completion. A change in the indicator light – perhaps from solid to blinking, or a complete switch-off – signals the end of the cleaning process. Refer to your specific model’s manual for precise indicator meanings.
Post-Cleaning Procedure
After the cleaning cycle concludes, carefully remove your dental appliance from the pod. It’s crucial to thoroughly rinse your appliance under cool, running water to eliminate any remaining cleaning solution residue. Ensure all traces of the solution are gone to prevent irritation.
Next, gently dry your appliance with a clean, lint-free cloth. Avoid abrasive materials that could scratch or damage the surface. Proper storage is vital; place your appliance in a clean, ventilated case to prevent recontamination. This simple post-cleaning routine ensures your appliance remains hygienic and ready for its next use, maximizing its lifespan and your oral health.
Rinsing Your Appliance
Immediately following the cleaning cycle, carefully lift your dental appliance from the pod. It’s essential to rinse it thoroughly under a gentle stream of cool, running water. This crucial step removes any lingering cleaning solution and dislodged debris, preventing potential irritation to your gums and mouth.
Inspect the appliance closely while rinsing, ensuring all surfaces are free of residue. Pay particular attention to intricate areas where solution might accumulate. Continue rinsing for at least 30 seconds to guarantee complete removal. A clean rinse is paramount for a safe and effective cleaning process, preparing your appliance for drying and storage.
Drying and Storage
After a thorough rinsing, gently pat your dental appliance dry with a clean, lint-free cloth. Avoid abrasive materials that could scratch or damage the surface. Ensure all crevices and hard-to-reach areas are completely dry to prevent bacterial growth.
Proper storage is vital for maintaining hygiene. Place your appliance in a clean, ventilated case specifically designed for this purpose. Avoid storing it in humid environments or leaving it exposed to air for extended periods. A dedicated case protects against contamination and damage, keeping your appliance fresh and ready for its next use, ensuring optimal oral health.
Maintenance and Care
To ensure the longevity and effectiveness of your Dental Pod, regular maintenance is crucial. Periodically clean the pod’s tank with a mild detergent and soft cloth, removing any residue or mineral buildup. Inspect the ultrasonic transducer for any damage and avoid abrasive cleaners.
Water quality significantly impacts performance; use distilled or filtered water to minimize scaling. Regularly check the power cord for fraying or damage. Proper care not only extends the pod’s lifespan but also guarantees optimal cleaning results for your dental appliance, contributing to consistent oral hygiene and preventing potential issues.
Regular Cleaning of the Pod Itself
Maintaining a clean Dental Pod is essential for optimal performance and hygiene. After each use, empty the tank and rinse it thoroughly with clean water. Periodically, use a mild detergent and a soft cloth to wipe down the interior, removing any lingering residue or mineral deposits.
Pay close attention to the ultrasonic transducer, ensuring it remains free from debris. Avoid abrasive cleaners, as they can damage the pod’s components. A clean pod ensures effective cleaning of your dental appliance, preventing cross-contamination and prolonging the device’s lifespan. Consistent cleaning contributes to a healthier oral care routine.
Water Quality Considerations

The quality of water used in your Dental Pod significantly impacts cleaning effectiveness and longevity. Distilled or filtered water is highly recommended to minimize mineral buildup within the tank and on the ultrasonic transducer. Tap water often contains minerals that can create deposits, reducing the pod’s efficiency and potentially causing damage over time.
Using purified water ensures a cleaner, more hygienic cleaning cycle for your dental appliance. Regularly check the water source and consider a water filter if tap water quality is a concern. Proper water selection contributes to optimal pod performance and a healthier cleaning process.
Troubleshooting Common Issues
If your Dental Pod isn’t powering on, first check the power cord connection and outlet functionality. A cycle failing to start might indicate insufficient water or an improperly placed appliance. Unusual noises could signal mineral buildup – try a cleaning cycle with distilled water.
If cleaning seems ineffective, ensure you’re using a fresh cleaning tablet each time and that the appliance is fully submerged. Persistent issues? Contact customer support. Regularly inspecting the tank for residue and addressing it promptly prevents further complications. Remember to unplug the pod before any inspection or maintenance.
Safety Precautions
Always unplug the Dental Pod before cleaning or performing any maintenance. Never operate the device if the power cord or plug is damaged. Keep the pod away from water splashes and avoid immersing it entirely. Use only recommended cleaning solutions – harsh chemicals can damage the unit and your appliance.
Ensure the pod is placed on a stable, level surface during operation. Do not attempt to disassemble or repair the device yourself; contact qualified service personnel. Keep out of reach of children. Avoid using the pod near flammable materials. Regularly inspect the tank for cracks or leaks before each use.

Recommended Cleaning Frequency
For optimal hygiene, clean your dental appliance with the Dental Pod after each use if worn for over six hours. This prevents harmful bacterial biofilm development, ensuring a consistently clean and healthy experience. Daily cleaning is ideal for full-time wearers of retainers or dentures.
If wearing your appliance intermittently, a minimum of three times per week is recommended. Consider increasing frequency during allergy seasons or if you experience increased saliva production. Consistent cleaning maintains appliance integrity and prevents unpleasant odors. Following these guidelines promotes excellent oral health and extends the life of your dental appliance.
Dental Pod vs. Traditional Cleaning Methods
Traditional methods, like manual brushing and soaking, often miss microscopic crevices where bacteria thrive. The Dental Pod utilizes ultrasonic technology, generating thousands of tiny cleaning waves for a deeper, more thorough clean without causing damage. Unlike abrasive pastes, the pod preserves the shape and structure of your appliance.
Soaking alone doesn’t provide the same level of agitation, potentially leaving residue behind. The Dental Pod offers a convenient, hands-free solution, eliminating the need for vigorous scrubbing. It’s a more effective and efficient way to remove plaque, gunk, and harmful buildup, promoting superior oral hygiene and appliance longevity.