
singer sewing machine 5050c manual
The Singer 5050C manual provides essential guidance for operating and maintaining this versatile zigzag sewing machine. It covers setup‚ stitching options‚ and troubleshooting for optimal performance.
1.1 Overview of the Singer 5050C Sewing Machine
The Singer 5050C is a versatile zigzag sewing machine designed for both straight and multi-width zigzag stitching. It features a removable platform for free-arm sewing‚ offering flexibility for various projects. The machine includes a stitch function guide‚ decorative stitch patterns‚ and flexi stitch modules‚ enhancing creativity. With a double needle capability for specific stitches‚ it caters to diverse sewing needs. This model‚ introduced in 2003‚ is known for its durability and user-friendly design‚ making it suitable for both beginners and experienced sewists. The manual provides detailed instructions to unlock its full potential‚ ensuring optimal performance and ease of use.
1.2 Importance of the Manual for Optimal Usage
The Singer 5050C manual is crucial for maximizing the machine’s capabilities. It provides step-by-step instructions for setup‚ threading‚ and using advanced features like the double needle and free-arm sewing. The guide explains how to access decorative and flexi stitch patterns‚ ensuring users can explore various stitching options. Troubleshooting tips and maintenance advice‚ such as cleaning and oiling‚ are also included to prolong the machine’s lifespan. By following the manual‚ users can avoid common mistakes and ensure smooth operation‚ making it an indispensable resource for both beginners and experienced sewists to achieve professional results.
Key Features of the Singer 5050C Sewing Machine
The Singer 5050C offers versatile stitching with straight‚ zigzag‚ and decorative patterns. It features a free-arm design‚ double needle capability‚ and customizable stitch options for enhanced creativity and precision.
2.1 Stitch Options and Functions
The Singer 5050C offers a variety of stitch options‚ including straight stitch‚ multi-width zigzag‚ and decorative patterns. These functions allow for versatility in sewing projects‚ from basic repairs to intricate designs. The machine’s stitch guide provides clear instructions for selecting and adjusting stitches‚ ensuring precise results. Users can customize stitch length and width to suit different fabrics and techniques. Additionally‚ the 5050C supports double needle stitching for professional finishes. This range of stitch options makes it suitable for both beginners and experienced sewists‚ catering to a wide array of sewing needs and creative projects.
2.2 Built-In Stitch Patterns and Modules
The Singer 5050C features two built-in stitch pattern modules: decorative patterns and flexi stitch patterns. These modules offer a variety of creative stitching options‚ from basic to intricate designs. The decorative module includes traditional patterns for embellishing fabrics‚ while the flexi module provides versatile‚ adjustable stitches for different sewing needs. A separate stitch function guide is available for easy reference‚ helping users navigate the machine’s stitching capabilities. This feature-rich design allows sewists to explore various techniques‚ making the 5050C ideal for both everyday projects and specialized sewing tasks. The modules enhance creativity and precision‚ ensuring professional-quality results.
2.3 Free-Arm Sewing Capability
The Singer 5050C features a removable platform‚ enabling free-arm sewing for enhanced versatility. This capability allows for easy sewing of cylindrical or hard-to-reach areas‚ such as cuffs‚ sleeves‚ and pant legs. The free-arm design provides better control and precision when working on smaller or intricate projects. It is particularly useful for quilting‚ embroidery‚ and delicate fabrics. The machine’s portability and this feature make it ideal for both home and professional use. The manual provides clear instructions on how to utilize the free-arm function effectively‚ ensuring users can take full advantage of this convenient feature for a wide range of sewing tasks.

Setting Up the Singer 5050C Sewing Machine
Unpacking and initial setup involve threading‚ bobbin installation‚ and using the needle threader. These steps ensure proper machine function and readiness for sewing projects.
3.1 Unpacking and Initial Setup
Unpacking the Singer 5050C is an exciting first step. Carefully remove the machine from its box and inspect for any damage. Place it on a stable‚ flat surface and plug it in. Unpack all accessories‚ including the power cord‚ presser feet‚ and bobbin. Refer to the manual for identifying each part. Before use‚ ensure the machine is clean and free from packaging materials. Familiarize yourself with the control panel and stitch guide. Store unused accessories in a safe place to avoid loss. Proper setup ensures smooth operation and prevents potential issues. Take your time to organize everything neatly for easy access.
3.2 Threading the Machine
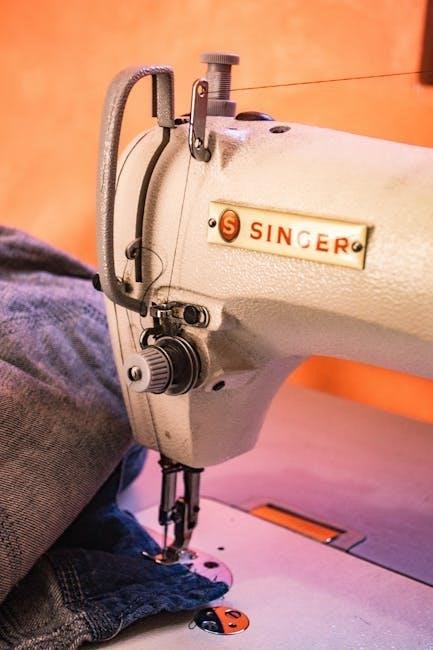
Threading the Singer 5050C is a straightforward process. Begin by turning the handwheel to raise the needle to its highest position. Locate the spool pin and draw the thread through the tension discs. Guide the thread through the take-up lever and then through the needle’s eye. Use the built-in needle threader for ease. Gently pull the thread to ensure it’s seated properly. If unsure‚ refer to the manual or online guides for visual assistance. Proper threading ensures smooth stitching and prevents machine jams. Always use high-quality thread suitable for your fabric type to achieve the best results.
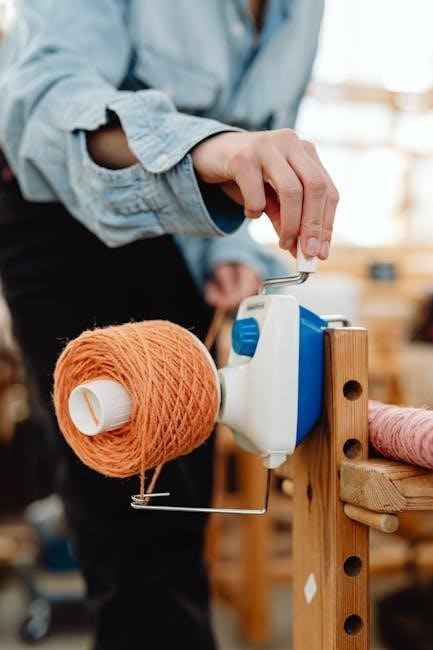
3.3 Winding and Installing the Bobbin
To wind the bobbin‚ place it on the bobbin winder and draw the thread through the guide. Wind slowly until the bobbin is full‚ then cut the thread. Next‚ insert the bobbin into the bobbin case‚ ensuring it clicks into place. Pull the thread through the tension spring to secure it. Close the shuttle cover and test the machine to ensure proper thread flow. Proper bobbin installation is crucial for even stitching. Refer to the manual or online tutorials‚ like the demo video‚ for visual guidance to avoid common mistakes and ensure smooth operation;
3.4 Using the Needle Threader
The Singer 5050C features a built-in needle threader‚ located near the needle bar. To use it‚ position the thread through the threader’s guide and gently pull it through the needle eye. This tool simplifies threading‚ especially for users with vision challenges. Ensure the thread is taut and align it with the threader’s groove for smooth operation. After threading‚ cut the excess thread close to the needle. The needle threader is a convenient feature that saves time and reduces frustration. Refer to the manual or online tutorials for step-by-step guidance if needed.
Understanding the Stitch Function Guide
The Singer 5050C manual includes a stitch function guide‚ detailing straight‚ zigzag‚ and decorative stitches. It helps users select the right stitch for their projects efficiently.
4.1 Straight Stitch and Zigzag Stitch
The Singer 5050C offers a variety of stitches‚ including the essential straight stitch for basic sewing and the multi-width zigzag stitch for decorative or reinforced seams. The straight stitch is ideal for straight-line sewing‚ such as repairing tears or sewing straight edges‚ while the zigzag stitch is perfect for finishing raw edges‚ preventing fraying‚ or creating decorative borders. The machine allows easy switching between these stitches using the stitch selector. The zigzag stitch can also be adjusted in width to suit different fabrics and projects. Refer to the stitch function guide for detailed instructions on selecting and customizing these stitches for optimal results.
4.2 Decorative Stitch Patterns
The Singer 5050C features an array of decorative stitch patterns designed to enhance your sewing projects. These patterns include intricate designs for embellishing fabrics‚ creating borders‚ or adding texture. The machine’s built-in modules provide various options‚ from simple to complex motifs‚ suitable for different fabrics and styles. Users can easily select these patterns using the stitch selector dial or button‚ as outlined in the stitch function guide. Decorative stitches are perfect for crafting‚ quilting‚ or personalizing garments. The manual provides clear instructions on how to navigate and customize these patterns to achieve professional-looking results for any creative project.
4.3 Flexi Stitch Patterns
The Singer 5050C offers Flexi Stitch patterns‚ providing versatility for various sewing projects. These patterns allow for adjustable stitch lengths and widths‚ enabling customization to suit different fabrics and designs. The machine’s modular system includes a dedicated module for Flexi Stitches‚ making it easy to switch between decorative and flexible stitching options. Users can create intricate designs with ease‚ whether for home decor‚ garments‚ or crafts. The manual provides step-by-step guidance on selecting and adjusting Flexi Stitch patterns‚ ensuring precise control over every stitch. This feature enhances creativity and adaptability‚ making the Singer 5050C a versatile tool for sewists of all skill levels.
Basic Operations of the Singer 5050C
The Singer 5050C’s basic operations include starting and stopping the machine‚ adjusting stitch length and width‚ and using the reverse stitch function for secure seams.
5.1 Starting and Stopping the Machine
To start the Singer 5050C‚ ensure the machine is properly plugged in and threaded. Use the power switch located on the right side to turn it on. For manual control‚ the handwheel allows you to start sewing slowly. Always begin with a few straight stitches to secure fabric; To stop‚ gradually reduce the machine’s speed and ensure the needle is in the raised position. Turn off the power switch and unplug if not in use. Proper starting and stopping techniques prevent fabric damage and ensure smooth operation.
5.2 Adjusting Stitch Length and Width
The Singer 5050C allows easy adjustment of stitch length and width using the control dials. For straight stitches‚ set the length between 0-4 and width to 0. For zigzag‚ adjust the width up to 5. Decorative stitches may require specific settings‚ as outlined in the stitch guide. Always test adjustments on scrap fabric to ensure desired results. Proper adjustment ensures even stitching and prevents fabric puckering. Refer to the manual for detailed guidance on optimizing stitch settings for various fabrics and projects.
5.3 Using the Reverse Stitch Function
The reverse stitch function on the Singer 5050C is essential for securing seams. Engage it by pressing the reverse button or moving the reverse lever. This feature reinforces stitching at the beginning and end of seams‚ preventing fraying. It is particularly useful for heavy fabrics or delicate materials. Always test the reverse stitch on scrap fabric to ensure proper function. Regular use of this feature enhances the durability of your projects. Refer to the manual for specific instructions on activating and adjusting the reverse stitch for optimal results.

Advanced Features and Techniques
Explore advanced sewing techniques with the Singer 5050C‚ including double needle sewing‚ free-arm capabilities‚ and customizable stitch patterns for enhanced creativity and professional results.
6;1 Using the Double Needle
The Singer 5050C allows for double needle sewing‚ enabling simultaneous straight and zigzag stitching. This feature is ideal for sewing straight lines or decorative edges. To use the double needle‚ ensure it is properly attached and aligned. The machine supports two needles‚ allowing for parallel stitching‚ which is perfect for heavy fabrics or creating professional finishes. Always refer to the manual for specific thread guidance and tension adjustments. Using the double needle enhances efficiency and precision‚ making it a valuable tool for advanced sewing projects. Proper setup and maintenance are crucial for optimal performance.
6.2 Sewing with the Free-Arm
The Singer 5050C features a removable platform‚ enabling free-arm sewing for easier access to hard-to-reach areas. This is ideal for sewing cuffs‚ sleeves‚ and other small or cylindrical items. To use the free-arm‚ simply detach the flatbed‚ providing a compact workspace. The free-arm design allows for better control and precision when working on intricate or curved projects. It is particularly useful for home decor‚ alterations‚ and crafting. Always ensure the machine is stable and the fabric is guided smoothly for consistent results. This feature enhances versatility‚ making the Singer 5050C suitable for a wide range of sewing tasks.
6.3 Customizing Stitch Patterns
The Singer 5050C allows users to customize stitch patterns‚ offering flexibility for creative projects. With decorative and flexi stitch options‚ sewers can adjust stitch length and width to suit their needs. The machine also supports combining patterns for unique designs. Advanced users can experiment with double needle setups for intricate stitching. The stitch function guide provides detailed instructions for customization. This feature is particularly useful for tailoring‚ home decor‚ and crafting. By exploring these options‚ users can unlock the full potential of their Singer 5050C‚ achieving professional-quality results with ease and precision.
Maintenance and Care of the Singer 5050C
Regular cleaning‚ oiling‚ and checking for dust ensure smooth operation. Use a soft cloth to wipe surfaces and avoid harsh chemicals to protect the machine’s finish.
7.1 Cleaning the Machine
Regular cleaning is crucial for maintaining the Singer 5050C’s performance. Turn off and unplug the machine before cleaning. Use a soft‚ dry cloth to wipe down surfaces‚ removing dust and lint. Avoid harsh chemicals or abrasive materials that could damage the finish. Pay special attention to the bobbin area‚ stitch plate‚ and tension discs‚ as these areas tend to accumulate debris. For tight spaces‚ a small brush or compressed air can be used gently. Cleaning after each project helps prevent fabric residue from building up and ensures smooth operation. Regular maintenance extends the machine’s lifespan and keeps it functioning optimally.
7.2 Oiling the Machine
Regular oiling is essential to keep the Singer 5050C running smoothly. Locate the oiling points as indicated in the manual‚ typically near the bobbin area and hook race. Use only high-quality sewing machine oil to prevent damage. Turn off the machine and apply a few drops to the specified areas. Gently operate the handwheel to distribute the oil evenly. Avoid over-oiling‚ as excess oil can attract dust and lint. Clean up any drips with a soft cloth. Oiling should be done every 50 hours of use or when you notice increased friction. Proper lubrication ensures quiet operation and extends the machine’s lifespan.
7.3 Troubleshooting Common Issues
Common issues with the Singer 5050C include thread jams‚ uneven stitching‚ or the machine not turning on. First‚ check if the machine is properly plugged in and the power switch is on. For thread jams‚ gently remove the fabric and rethread the machine. Ensure the bobbin is correctly installed and the tension is balanced. If stitches are uneven‚ adjust the stitch length and width or consult the manual for guidance. Regular cleaning and oiling can prevent many issues. Refer to the troubleshooting section in the manual for detailed solutions to specific problems‚ ensuring smooth operation and extending the machine’s lifespan.
Accessories and Additional Equipment
The Singer 5050C comes with a removable platform for free-arm sewing and includes a stitch function guide. Optional presser feet and additional accessories enhance its versatility for various projects.
8.1 Included Accessories
The Singer 5050C sewing machine comes with a range of included accessories to enhance your sewing experience. These include a removable free-arm platform‚ ideal for sewing cuffs and pant legs‚ and a stitch function guide to help you navigate the machine’s various stitching options. Additionally‚ the machine includes a bobbin‚ double needle‚ and presser feet for different sewing tasks. A demo video is also available‚ showcasing how to wind a bobbin on the Singer 5050C. These accessories ensure you have everything you need to start sewing right away‚ whether you’re working on basic projects or more complex designs.
8.2 Optional Presser Feet
The Singer 5050C offers optional presser feet to expand its functionality. These include a zipper foot for precise zipper installation‚ a blind hem foot for invisible hems‚ and a walking foot for heavy fabrics. Additional feet like a quilting foot or an overlock foot can also be purchased separately. These accessories allow for specialized sewing tasks‚ enhancing the machine’s versatility. They are designed to fit seamlessly with the Singer 5050C‚ ensuring optimal performance for various projects. Optional presser feet can be found through Singer’s official website or authorized retailers‚ making it easy to customize your sewing experience to your needs.
8.3 Other Recommended Accessories
Beyond the included and optional presser feet‚ the Singer 5050C benefits from additional accessories to enhance your sewing experience. A carrying case is ideal for transporting the machine to classes or storage. An extension table provides extra workspace for larger projects‚ while a set of specialized needles ensures optimal performance for various fabrics. The stitch function guide‚ though separate‚ is invaluable for exploring decorative and flexi stitch patterns. For free-arm sewing‚ the removable platform is a must. These accessories‚ available through Singer’s official website or authorized dealers‚ help maximize the machine’s potential and adapt to diverse sewing needs.

User Guide and Quick Start
The Singer 5050C manual includes a quick start guide to help beginners set up and operate the machine efficiently. It provides step-by-step instructions for threading‚ bobbin winding‚ and basic stitching‚ ensuring a smooth start to your sewing journey.
9.1 Quick Start Guide
The Singer 5050C Quick Start Guide offers a concise approach to setting up and using the machine. It covers unpacking‚ threading‚ and bobbin installation‚ ensuring a seamless start. The guide also explains basic stitch selection‚ including straight and zigzag stitches‚ and provides tips for using the needle threader. Additionally‚ it highlights the importance of proper thread tension and fabric placement. For visual learners‚ a quick demo video demonstrates winding a bobbin and initial setup. This guide is perfect for beginners‚ helping them start sewing projects confidently. Always refer to the manual for troubleshooting common issues during setup.
9.2 Step-by-Step Guide for Beginners
The Singer 5050C Step-by-Step Guide for Beginners is designed to help new users master the machine’s basics. Start by unpacking and assembling the machine‚ ensuring all parts are accounted for. Next‚ learn to thread the machine correctly‚ using the needle threader for ease. Wind and install the bobbin‚ then select a basic stitch like the straight or zigzag stitch. Practice sewing on scrap fabric to get familiar with the machine’s rhythm. Adjust stitch length and width as needed‚ and explore the free-arm sewing feature for cuffs or sleeves. This guide ensures a smooth transition from setup to sewing with confidence.

Safety Tips and Precautions
Always keep loose clothing tied back and avoid sewing over fingers. Ensure the machine is on a stable surface and keep children away. Handle needles and threads with care to prevent accidents.
10.1 General Safety Guidelines
Always prioritize safety when using the Singer 5050C sewing machine. Keep loose clothing and long hair tied back to avoid accidents. Never sew over fingers or near flammable materials. Use the needle threader carefully to prevent eye injury. Ensure the machine is placed on a stable‚ flat surface. Keep children and pets away while operating. Avoid sewing when tired or distracted. Disconnect the machine from power when not in use or during maintenance. Follow all instructions in the manual to ensure safe and effective operation. Regularly inspect the machine for damage or wear to maintain optimal performance and safety.
10;2 Handling the Machine Safely
Handle the Singer 5050C with care to ensure longevity and prevent accidents. Always lift the machine from the bottom using both hands for stability. Avoid touching hot parts like the needle or presser foot during operation. Keep the machine on a stable‚ flat surface to prevent tipping. Use the built-in handle for portability‚ ensuring the machine is secure. Never pull or jerk the power cord‚ as this can damage the machine or cause injury. When moving the machine‚ ensure the area is clear of obstacles. Always unplug the machine before cleaning or performing maintenance to avoid unexpected start-ups.
The Singer 5050C manual is a comprehensive guide to mastering this versatile sewing machine. It ensures optimal performance‚ safety‚ and creativity‚ helping users achieve professional results in every stitch.
11.1 Summary of Key Points
The Singer 5050C manual is a detailed guide for mastering this versatile sewing machine. It covers setup‚ stitching options‚ and maintenance‚ ensuring optimal performance. Key features include straight stitch‚ zigzag‚ and decorative patterns‚ along with free-arm sewing capability. The manual emphasizes proper threading‚ bobbin installation‚ and needle threader usage. It also provides troubleshooting tips and safety guidelines. By following the manual‚ users can explore advanced techniques like double needle sewing and custom stitch patterns; Regular maintenance‚ such as cleaning and oiling‚ is stressed to prolong machine life. This comprehensive resource empowers users to unlock the machine’s full potential for both basic and creative projects.
11.2 Final Tips for Effective Usage
Regularly maintain the machine by cleaning and oiling to ensure smooth operation. Experiment with various stitch patterns to enhance creativity in projects. Use the correct presser foot for different fabrics to achieve professional results. Keep the manual handy for quick reference when exploring advanced features. Practice threading and bobbin installation to save time during sewing sessions. For intricate designs‚ utilize the free-arm feature for better control. Explore the double needle capability for unique stitching effects. By following these tips‚ users can maximize the Singer 5050C’s potential and enjoy a seamless sewing experience for both basic and complex tasks.
References and Further Reading
Consult the official Singer 5050C manual for detailed instructions. Additional guides and tutorials are available on Singer’s official website and YouTube channels for further assistance.
12.1 Official Singer 5050C Manual
The official Singer 5050C manual is a comprehensive guide available for download at Singer’s official website. It provides detailed instructions for setup‚ operation‚ and troubleshooting. The manual covers stitch options‚ including straight‚ zigzag‚ and decorative patterns‚ as well as the use of the free-arm sewing feature. It also includes a stitch function guide and instructions for using the double needle. This resource is essential for both beginners and experienced users to maximize the machine’s capabilities. Additional support and tutorials can be found on Singer’s website and YouTube channels.
12.2 Online Resources and Tutorials
Beyond the official manual‚ numerous online resources and tutorials are available for the Singer 5050C. YouTube offers demonstration videos‚ such as a bobbin-winding guide‚ to help users master specific functions. Sewing forums and communities‚ like Singer’s official website‚ provide tips and troubleshooting advice. Experts like Debbis Sewing Machine Repair share insights‚ while platforms like YouTube host tutorials on threading‚ stitch customization‚ and free-arm sewing. These resources complement the manual‚ offering visual and interactive learning opportunities for both beginners and experienced sewists to enhance their skills with the Singer 5050C.